UPC Barcode
How UPC barcode is helpful for business.
If you have barcode font knowledge and as you look into your cupboard or pantry right now, you will be really stunned to find that just about every package you see a UPC barcode printed on it. Nearly each and every item you tend to purchase is packed with the inclusion of a barcode created in user desired style using UPC barcode fonts. Business owners’ objective should not only be to create EAN UPC barcode for business enhancement but at the same time to create professional UPC barcode types consisting of UPC A barcodes and UPC E barcode code of premium quality that can solve your business complexity with ease. And now to make UPC barcode for your business, what you really need is to get in hand the easy to use UPC barcode creator software.
Barcode Generate – Corporate Edition provides facility to design barcode in any linear or 2D barcode Font.
Here we are explaining step by step process about how to generate UPCA barcode using barcode generator – Corporate Edition.
You can design and print UPCA barcode using any of the following methods -
Sample of UPCA Barcode Font

Sample of UPCA Barcode font designed using barcode generator – Corporate Edition.
Choose designing mode either barcode settings or barcode designing view (here for demonstration purpose we are using barcode designing view method).
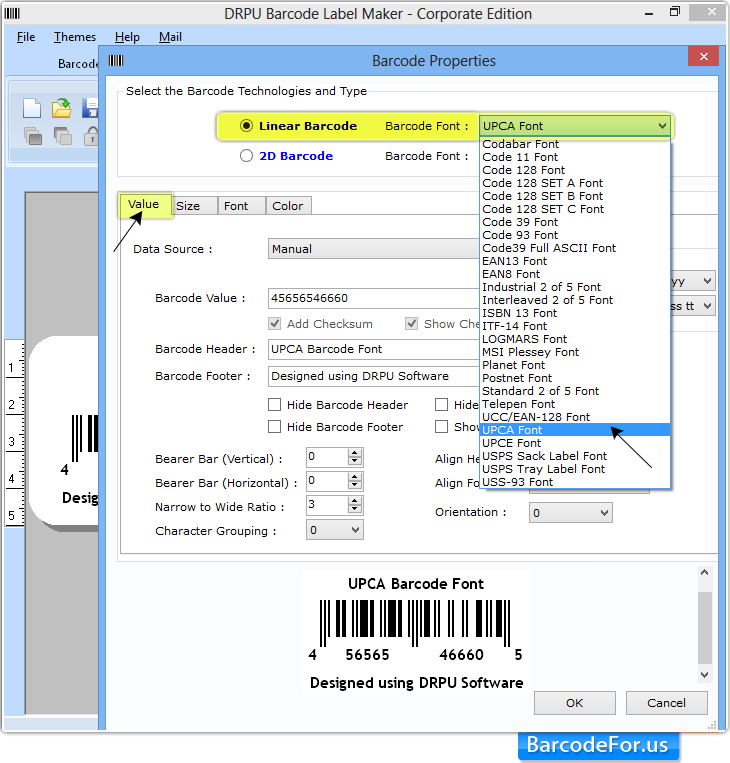
To insert UPCA barcode on label, click on barcode icon from drawing tools. Double click on default barcode to work on its properties as shown below.

First select barcode technologies and type (e.g Linear Barcode and UPCA Font).
Using Value tab, Enter barcode value, you can also enter barcode header and footer as per requirement as shown in above screenshot.
In this tab you also have an option to adjust Bearer Bar (Vertical and Horizontal), narrow to wide ration, align header and footer, orientation etc.

Now you can set bar height, density and different margins including top and bottom margin, left and right margin, barcode value margin, barcode header margin and barcode header margin as per required.
You can also use other barcode properties tab like –
1 Font Tab - Using this tab, you can set font, font style and font size of barcode value, header and footer.
2 Color Tab – You can change barcode color, barcode background color, barcode header, footer and value color using color tab.

Set card properties, card properties have following options –
1 General - Here you can specify a Card Shape (Rectangle, Rounded Rectangle or Ellipse), b Card Name and Size (Height and Width), and c Set Border (Show border).
2 Fill Background - Fill background color and set image as card background.
3 Image Processing - Set image brightness, contrast and hue as per requirement.
Once you design your UPCA barcode font, DRPU Barcode generator provides option to print your create barcode label.
Click on “Print” icon from standard tools, following print window will be appeared -

1 First choose Printing mode
b Manual
Here we are choosing Manual print mode to print generated barcode label. Follow few easy steps -
2 Select print profile.
3 Set page properties using Add or Edit button.
4 Adjust margin between labels (Vertical and horizontal).
5 Set other print option like printer, paper used, total labels on page etc.
6 Press “Print” button to start printing process.

Above screen shows printing of UPCA barcode font label using thermal printer.

Now your UPCA barcode label is ready to use. You can scan it (as shown in above screenshot) using any type of barcode scanner.


